Contents
- Previous
- Next
The program overview
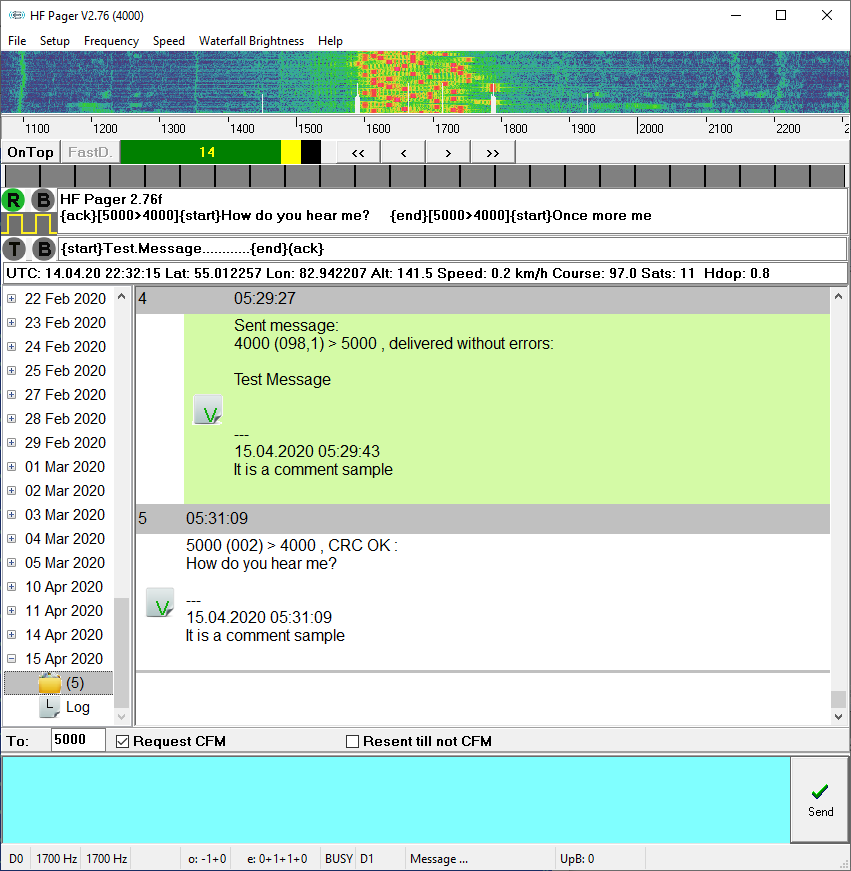
The working area of the program is divided into several windows, the sizes of which can be changed by the user by dragging the borders.

In the top window the current spectrum of a signal in waterfall view are shown.The vertical thin lines in this window show the frequency limits of the RX filters.
The short thick black lines show TX frequencies limits.
Ruler under top window shows frequencies of sound spectrum. RX and TX frequencies and shifts are also shown in the status line.
The center frequencies of the transmit and receive can be changed by the "Frequency" menu.
You can use screen buttons located below spectrogram ruler for fine tuning.
The "<" button move RX frequency to 1 Hz down.
The ">" button move RX frequency to 1 Hz up.
The "<<" button move RX frequency to 10 Hz down.
The ">>" button move RX frequency to 10 Hz up.
The "Speed" menu allows you to select one of two possible TX speeds. The program receives signals with both speed simultaneously.
The "OnTop" button puts HF Pager in front of all windows.
The "File / Open Wave Capture File" command opens wave-file to save all sound received from soundcard. File is closed by the "File->Close Wave Capture File" command. Take to attention that a minute of sound recording need above 1 MByte disk space.
HF Pager can decode signals from a WAVE-file. Desired file is selected by the "File->Decode From File" command.
A WAVE-file must be Windows PCM file, without compression.
The "File->Stop Decoding From File" command is used to abort of decoding.
The "FastD" button defines speed of playing a file during decoding. When button is pressed a file is decoded at maximal speed, spectrogram is not shown.
To the right of the "FastD" button is a three-color peak indicator of the received signal level. The number in this indicator is the number of significant bits of the signal. The red color of the indicator (15 significant bits) indicates an overload of the sound card, the input signal level MUST be reduced. Yellow color (14 bits) is the optimal level, the dynamic range of the sound card is fully used, but there is no overload.
The line of gray, yellow and green rectangles shows the results of test messages used for channel monitoring (beacons) receiving during the past four hours. Read more below.
Below are text fields which display the process of receiving and transmitting and graphical indicators.
The upper left indicator is activated when a message is received:
 Message body is received.
 Body of simple beacon is received.
 Body of beacon with GPS-data is received.
 Body of message with corrupted header is received.
The indicator to the right (letter B on a yellow background, BUSY) - shows that the channel is busy, there is a pause after receiving a message or its header.
The indicator in the form of a meander below shows the presence of a received signal (more precisely it shows a stable symbolic synchronization).
The indicator in the form of the letter T on a red background is activated during transmission,
another B on a yellow background to right shows a protective pause which is made after a transmission.
Received and sent messages are displayed below:

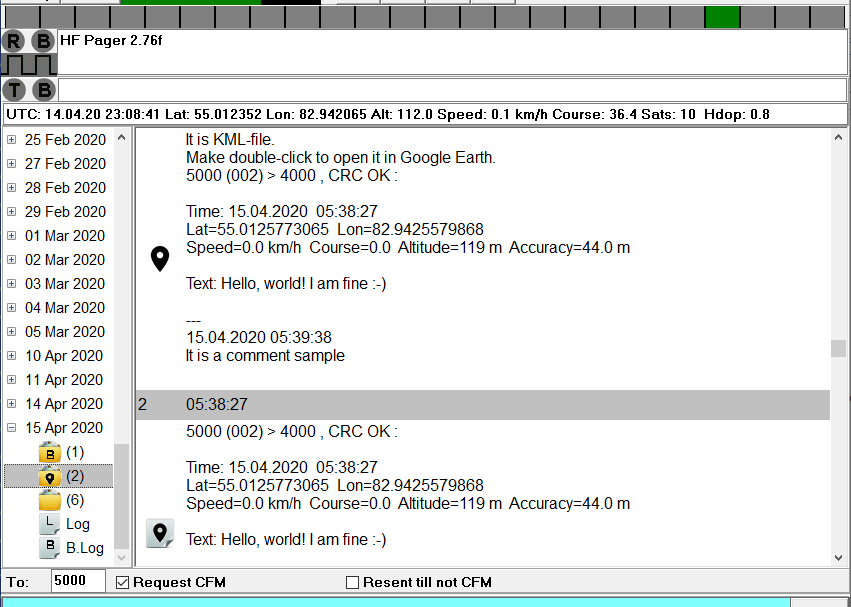
The "tree" is displayed in the left part of window, with which you can select the date and type of data displayed in the right part.
 - automatic messages ("beacons") received per day ;
 - beacons containing GPS coordinates received per day;
The beacon messages containing GPS coordinates are recorded three times - once in the  folder
together with the usual beacons, and twice to the  folder,
as plain text and as a KML file. The messages in this folder are marked not by receiving time, but by time of the GPS-fix.
 - received, sent and prepared for sending messages;
 - raw log of received data;
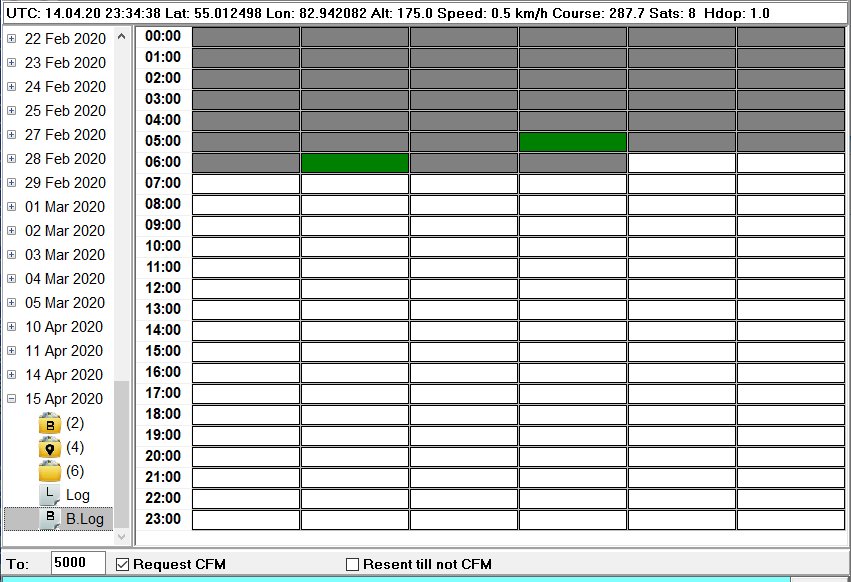
 - "channel control" history per day in a graphical form:

The history shows received beacon messages addressed to your callsign.
Green rectangle means that at least one beacon message is correctly received in this 10-minute interval;
Yellow rectangle means that a beacon header is received but the beacon message contains an error.
Double-click on a message in the program window opens this message by an external program.
Right-click on the icon in the tree or on the message brings up a context menu with additional commands.
At the bottom of the program window there is a field for entering a new message and additional controls.

The "To" field contains the callsign of the message recipient (a number in the range 1 ... 65534).
If the "Request CFM" option is enabled, the recipient program will generate an automatic message about successful reception (or about a reception error).
If the option "Repeat til not CFM" is enabled, the message will be repeated until confirmation is received or the number of attempts has been exhausted (five times).
The windows appearance can be changed via the "Setup / Fonts & Colors" options.
Selected options of the program are saved by the "Setup / Save" button. By default options are written into the HFPAGER.INI file. The program looks for this file in the working directory. If the HFPAGER.INI file is not found in a working directory, working directory is changed to a default value. You can have several variants of the ini-file for different situations. Just create several shortcuts to HFPAGER.EXE each with a different working directory and copy HFPAGER.INI file to each of this directories.
The number shown in the "UpB:" field of the status bar shows the number of captured but not processed buffers of sound signal. If it is increases to five or more the speed of the computer is not keep up. Try to reduce the number of simultaneously running programs or replace the computer :-).


